Today, Apple released an ‘update’ as intended specifically for fixing ‘Error 53’ which was controversially bricking iPhones that were repaired at unauthorized iPhone repair shops. This new update still is iOS 9.2.1 with a different bulid number: 13D20, the previous build was 13D15.
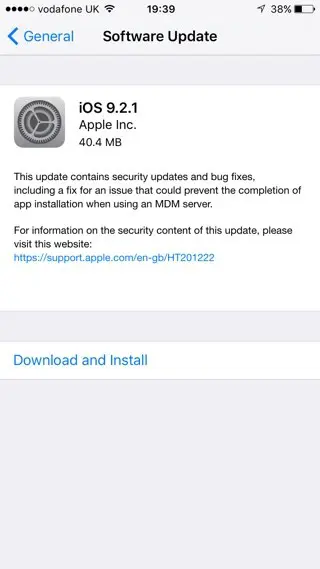
In order to resolve the matter, Apple specially issued an apologizing statement to TechCrunch.
Some customers’ devices are showing ‘Connect to iTunes’ after attempting an iOS update or a restore from iTunes on a Mac or PC. This reports as an Error 53 in iTunes and appears when a device fails a security test. This test was designed to check whether Touch ID works properly before the device leaves the factory.
Today, Apple released a software update that allows customers who have encountered this error message to successfully restore their device using iTunes on a Mac or PC.
We apologize for any inconvenience, this was designed to be a factory test and was not intended to affect customers. Customers who paid for an out-of-warranty replacement of their device based on this issue should contact AppleCare about a reimbursement.
So if your device are already running iOS 9.2.1 and don’t have the Error 53 issue, then you won’t receive any new OTA updates. However those users whose devices got bricked after the update can download the new build from iTunes or an IPSW (links given below) and restore their iPhone.
Download iOS 9.2.1 13D20 IPSW for iPhone 6s, iPhone 6s Plus, iPhone 6 and iPhone 6 Plus.
How to fix bricked iPhone 6, 6s, 6 Plus and 6s Plus due to Error 53
Step 1: Update your iTunes to the latest version, you can click on iTunes in the menu bar and then click on “Check for updates.”
Step 2: Download iOS 9.2.1 13D20 IPSW from the above links.
Step 3: Connect your iPhone to computer using an USB cable, then waiting for iTunes to open and connect to your device.
Step 4: Click on device button to the left of the iTunes Store button in the top right corner in iTunes.
Step 5: Next, you need to hard reset or force restart your iPhone.
Press and hold the Sleep/Wake or Power button on the right side of your iPhone 6 or later or on top for all other iPhones.
Press the Home button while still holding the Sleep/Wake or Power button.
Hold the two buttons simultaneously till the display turns your iPhone reboots and displays the Apple logo.
Step 6: After you’ve force restarted your iPhone, hold the Alt/Option key on the Mac or Shift Key in Windows on your keyboard and click on the Check for Restore option, then Navigate in the file system to the IPSW file you downloaded and select it.
Important Note: Please the above process will wipe all the data from your iPhone. If you don’t want data to be wiped, then hold the Alt/Option key on the Mac or Shift Key in Windows on your keyboard and click on the Check for Update option,
Step 7: Confirm that you want to restore or update to iOS 9.2.1 by clicking on ‘Restore’ or ‘Update’
Step 8: Do not disconnect your device until the restore process has finished. It can take 15-30 minutes. iTunes will show a progress bar as it extracts the software from the IPSW file, updates the iPhone / iPad / iPod touch, and then reboots.
When finished, the bricked iPhone will reboot itself automatically and enter the iOS 9.2.1 setup screens. You’ll be prompted to pick a six digit passcode, setup Hey Siri, and asked a few other questions. Run through the simple setup, and you’ll be presented with your device that is freshly updated to iOS 9.2.1. Enjoy!
Please note that if you’ve repaired your iPhone’s Home button from an authorized repair shop then this process with disable the Touch ID feature to protect your device and prevent a fraudulent Touch ID sensor from being used.


![iPhone 5 Running iOS 9.3.3 and iOS 9.3.2 [Speed Comparison]](https://applelives.com/wp-content/uploads/2016/05/speed-test-300x155.jpg)






+ There are no comments
Add yours