
OS X El Capitan is indeed a great system developed by Apple so far, it can also be installed inside a Windows PC with some tricks. Usually we only need to install Virtualbox such virtual machines on Windows to run the Mac OS X.
VirtualBox is basically a program, over which you can install and eventually run OS X with Intel-based and Amd processor. The whole process is very simple and clear, you only need to follow the tutorial below step by step to install Mac operating system on Windows PC.
Computer Requirements
Windows: 7 or 8 or 10 (64bit)
Processor: Intel
Memory 3072 MB (minimum)
BIOS: Enable virtualization in BIOS (VT-x)Software:
VirtualBox: VirtualBox 4.3.18 or 5.0
Image: Mac OS X 10.11 El Capitan Retail VirtualBox Image
Winrar or 7zip
Install Mac OS X El Capitan on VirtualBox
First, download the VirtualBox for Windows from its website. Once you have downloaded the VirtualBox then install it on your computer. If you run VMware or Hyper-V so you should not use them at the same time. Because you can not run two different Virtualization software on one PC. Because one Virtualization software you can use at the same time.
- Download and install Virtual Box
- Download and install WinRar
- Download Mac OS X 10.11 installer.ISO
We would suggest downloading (Mac OS X.app) El Capitan from:
- New Google Drive (1/1 Full): https://goo.gl/4XqHv7
- New Google Drive (7/7 Part): https://goo.gl/C5GyJO
- M.e.d.i.a.fire: https://goo.gl/ApokHE
- T.o.rr.en.t: https://goo.gl/wbpQVU
If all these download links broken, you can also go on Google to download the Mac OS X installer.ISO at your particular demand.
Step#1 Right click on the image file you just download using WinRar to extract the Image File on any folder you want.
Step#2 Install VirtualBox on Your PC.
Step#3 Create New Virtual Machine
- Open virtual box and click New to create a new virtual machine
- Then name it El Capitan Type and Version = MAC OS X (64bit) and click on Next.
- Allocate more than 3GB of ram and click on next.
- Then click on Use an existing virtual hard disk file and browse for the virtual hard disk file extracted from El Capitan Disk ISO Image and click on Create.
- Then select El Capitan virtual machine and click on Settings.
- Click on System and disable floppy
- Then click on Processor and assign 2 CPU’s or more.
- Under Acceleration disable Nested Paging and click Ok to close settings.
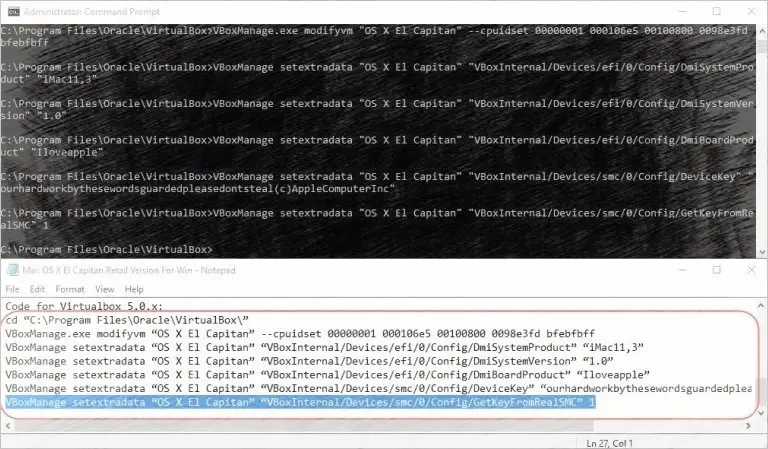
Step#4 Close virtual box and on your PC open cmd as admin.
In the command prompt type in cd C:\Program Files\Oracle\VirtualBox\ and press enter
Step#5 Copy and paste this code to your command prompt. Follow closely the instructions.
Frist, replace the “OS X Name” with your Virtual Machine name. Copy the below code and paste it into the notepad text editor. Then whatever you have named your Virtual Machine so you have to replace it. Then type in these commands one by one on the command window:
Code for Virtualbox 5.0.x:
VBoxManage.exe modifyvm “Your VM Name” –cpuidset 00000001 000106e5 00100800 0098e3fd bfebfbff
VBoxManage setextradata “Your VM Name” “VBoxInternal/Devices/efi/0/Config/DmiSystemProduct” “iMac11,3”
VBoxManage setextradata “Your VM Name” “VBoxInternal/Devices/efi/0/Config/DmiSystemVersion” “1.0”
VBoxManage setextradata “Your VM Name” “VBoxInternal/Devices/efi/0/Config/DmiBoardProduct” “Iloveapple”
VBoxManage setextradata “Your VM Name” “VBoxInternal/Devices/smc/0/Config/DeviceKey” “ourhardworkbythesewordsguardedpleasedontsteal(c)AppleComputerInc”
VBoxManage setextradata “Your VM Name” “VBoxInternal/Devices/smc/0/Config/GetKeyFromRealSMC” 1
Now, run CMD as administrator. Copy and paste each code to the cmd.
Step#6 Close command window and open virtual box. Start your new virtual machine El Capitan (It will take up to 5 min to start so you need to wait) If it doesn’t start then enable Nested Paging the one you disabled in the above step.
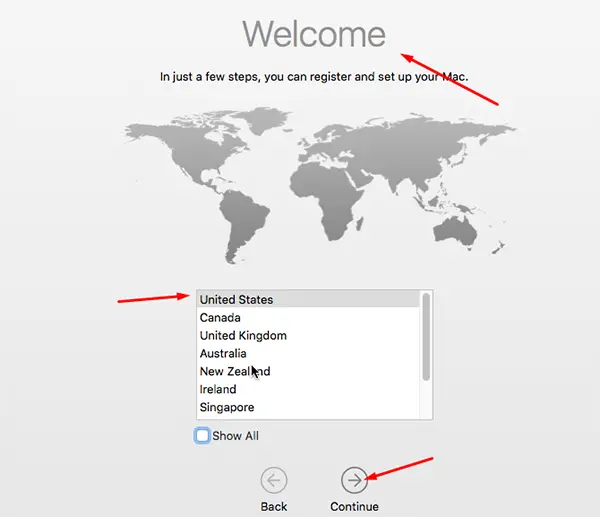
Step#7 Then the welcome screen will pop up and you select your language and run through the simple setup.
- Choose the keyboard and Language then click the “Continue” button.
- Choose the last option “My computer does not connect to the internet”. Some Service requires an internet connection. To choose a different configuration, click try again. To process with this setting. Click “Continue“.
- In the transfer information to this Mac window, you have three options to select. But here you have to select the last option “Don’t transfer any information now”. Hit the continue button.
- If you want to enable the location services, check the enabled service on this Mac. But I don’t want to enable location service. Click continue.
- Read the terms and conditions of Mac OS X Software license agreement then tap on “Agree” button. Now, feel the user account information. Type full name, account name, password, and hint.
- Select the time zone and hit the continue button. Uncheck the diagnostics & usage then hit on continue button.
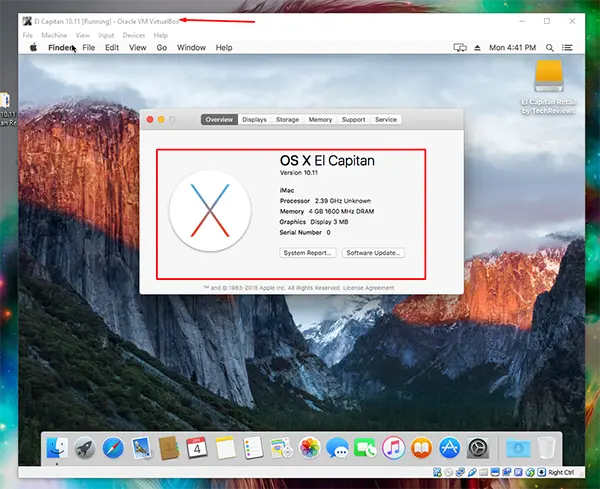
After you’re set up , it will boot straight to desktop and you’re good to go, also and Ethernet are working out of the box as well.


+ There are no comments
Add yours